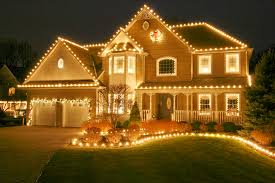
Holiday lights look simple from the street. Up close, they’re a small engineering project: plastic flexing in the cold, wind tugging on cords, and moisture trying to sneak into every connection point. If you want an install that stays put (and doesn’t turn into a mid-season repair job), the difference comes down to three things: the right clip for the surface, clean cord routing, and weatherproof mounting habits that don’t fight physics.
Use the Right Clip for the Surface (and the Temperature)
“Universal” clips are rarely universal. Gutters, shingles, fascia boards, brick—each one needs a different grip style, and the wrong choice usually fails the same way: the clip twists, the wire pops free, and the whole run starts to sag.
For gutters and drip edges, use clips designed to hook over the lip and hold the wire in a channel. That channel matters because it keeps the cord from rolling as the wind moves it. For shingles, go with shingle-tab clips that slide under the first layer and sit flat; if the clip forces the shingle up, it’s begging for water to sit where it shouldn’t. On smooth fascia, a tensioned “wrap” clip often holds better than a simple hook because it increases contact as the cord pulls.
Cold weather makes plastic less forgiving. If you’re installing in near-freezing temps, warm the clips inside first and work in smaller sections so the plastic doesn’t crack when you flex it into place. It’s a small detail, but it saves you from those mystery failures where everything looks clipped… until the first windy night.
Route Cords Like You’re Planning for Wind (Because You Are)
Most “lights fell down” problems aren’t actually clip problems. They’re routing problems. When the cord is under constant tension, clips become stress points. Your goal is a relaxed run with intentional slack where it’s needed.
Start by deciding where your power feed will enter the display, then work outward so you’re not stretching the final section to reach an outlet. Keep the main line tucked tight to the mounting surface, but build in tiny slack points at corners and direction changes. Corners are where cords want to pull away, especially on rooflines and porch wraps.
Any time you drop a line vertically (down a column, along a downspout, or toward a receptacle), add a drip loop before the plug or connector. That simple U-shaped dip helps water fall off before it can travel into the connection. And when you’re linking multiple strands, resist the urge to create long “daisy chains” that run far from your mounting surface—those long spans swing more in wind and gradually pry clips loose.
Also, keep electrical load and heat in mind. The U.S. Consumer Product Safety Commission includes guidance on avoiding overloaded circuits and cautions against stringing too many sets of lights together, especially with older incandescent strands (and it’s worth reviewing their broader holiday lighting safety tips before you plug everything in).
Weatherproof Mounting: Secure the Connection, Not Just the Light
A strand can be perfectly clipped and still fail if the connections aren’t protected. The weak spot is almost always where two plugs meet or where an extension cord connection sits in a puddle-prone spot.
First rule: elevate connections. If a connection is resting in a gutter, on soil, or on a flat ledge where water collects, you’ve created a miniature water bath. Lift it under an eave, behind trim, or to the side of a downspout where runoff won’t hit it directly. Second rule: lock the connection so it can’t separate. Many “weatherproofing” issues are really separation issues—wind shakes a loose plug, it arcs, and now you’ve got intermittent outages.
If you use cord covers or weatherproof connection enclosures, pair them with strain relief. That means the weight of the cord is supported by a clip or tie point before the plug connection, not by the plug itself. Think of it like supporting a hose so it doesn’t yank the spigot.
For short-term indoor-to-covered-outdoor setups (like window frames inside a sheltered porch), some installers create small cord guides or templates ahead of time so the run sits consistently year after year. If you’re doing that kind of prep on a workbench—away from direct weather exposure—something like water based glue can be useful for lightweight, temporary jigs or alignment aids. Just keep it out of the elements and always test removability on a scrap surface first, since paint and trim finishes vary a lot.
Make It Survive the Season (and Come Down Cleanly)
Wind doesn’t fail installations all at once. It loosens one section, then the next clip takes more load, and the “zipper effect” starts. The fix is to add stability where wind is strongest: peaks, corners, and long straight runs with no breaks.
On rooflines, reduce sway by clipping at consistent intervals and adding an extra clip within a few inches of corners. On wreaths, garlands, and yard décor, don’t rely on the light wire as the structural tie. Use a separate, hidden support (a thin outdoor-rated tie or line) and let the lights ride along it without carrying the load.
When it’s time to remove everything, don’t yank. Unclip with the same care you used to install, especially along painted trim. If you feel resistance, check whether the clip is caught under a shingle edge or lodged behind a gutter lip—forcing it is how you end up with scratched paint or bent metal.
Conclusion
If you remember one thing, make it this: the lights stay up when the cord is relaxed, corners are reinforced, and connections are protected from water and pulling—the clips are just the final piece holding that plan in place.