
If your yard turns into a mini pond after heavy rain, a lawn pop-up drain may help redirect excess water before it damages your lawn, landscaping or home’s foundation. Also called a pop-up emitter, this drainage component provides an outlet for water collected by an underground pipe system.
A pop-up drain is particularly useful for managing roof runoff from downspouts, water collected by yard drains and certain landscape drainage systems. Instead of leaving an above-ground extension across the lawn, the system carries water through a buried pipe and releases it at a carefully selected discharge point.
However, the emitter is only one part of the solution. Its performance depends on the pipe’s slope, the elevation of the outlet, the amount of water entering the system and the ability of the discharge area to carry water away safely.
In this guide, Ware Landscaping explains how lawn pop-up drains work, how they are installed, where they can fail and how to identify common drainage problems.
What Is a Lawn Pop-Up Drain?
A lawn pop-up drain is a surface outlet connected to an underground drainage pipe. Its hinged or spring-loaded cap rises when water pressure builds up during discharge and returns to its closed position when the flow stops.
The system typically collects water from a downspout, catch basin or compatible drainage inlet. A buried pipe carries the water to an emitter positioned at a suitable lower point in the yard.
Unlike a simple downspout extension, a pop-up system keeps most of the drainage route underground. This can create a neater lawn with fewer exposed pipes, provided the installation has enough elevation difference for water to flow and a suitable place for the runoff to go.
A pop-up emitter does not absorb water into the ground or eliminate excess groundwater by itself. It releases collected water at the surface. If the discharge area is poorly graded, saturated or too close to the foundation, water may continue to pool even when the emitter is working correctly.
Key Features and Benefits
A properly designed pop-up drain system can offer several advantages:
- Reduces water pooling: Moves collected runoff away from low spots and selected areas of the yard.
- Helps protect foundations: Provides a way to redirect downspout water away from the house when the route and outlet are appropriately designed.
- Keeps the lawn neater: Buried pipes reduce the need for long, exposed downspout extensions.
- Supports erosion control: Directs water toward a planned discharge area rather than allowing it to flow randomly across the lawn.
- Provides a discreet outlet: The cap generally sits at or near ground level when installed according to the manufacturer’s instructions.
- Allows straightforward inspection: The visible emitter can be checked for debris, damage and restricted movement.
These benefits depend on the complete drainage system. A pop-up drain cannot compensate for a blocked pipe, an unsuitable outlet location or a yard that has no practical gravity-flow route.
How a Lawn Pop-Up Drain Works
A pop-up drain uses the movement of water through a connected pipe to release runoff at a designated location.
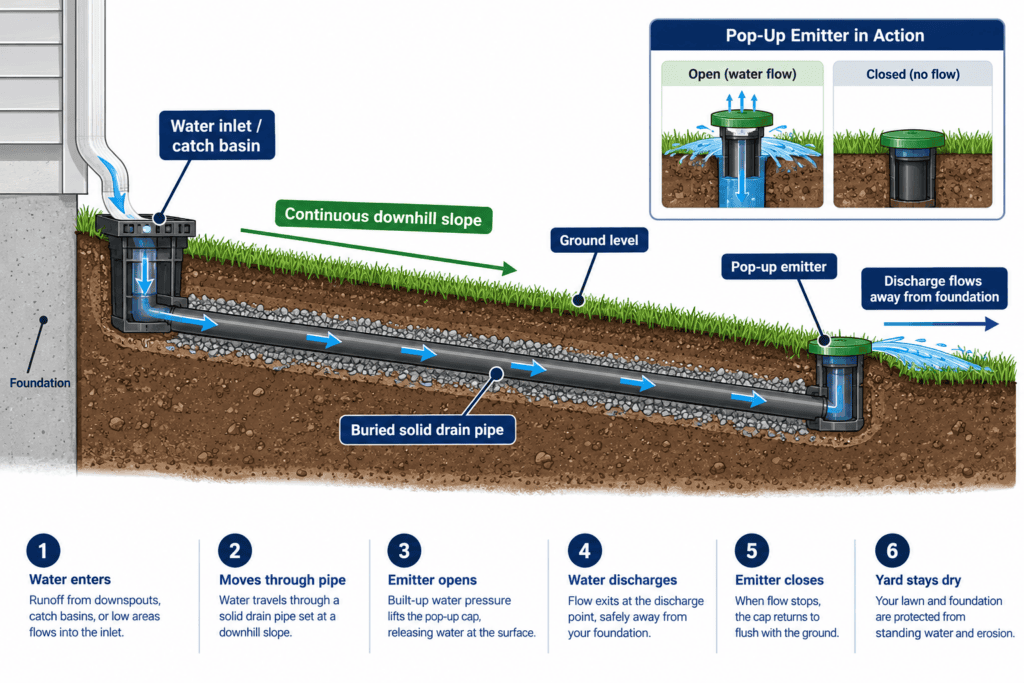
- Water enters the system. Runoff from a downspout, catch basin or compatible yard drain enters the drainage pipe.
- Water travels underground. The pipe carries the water toward the outlet. A continuous downward slope allows gravity to move water along the route.
- The emitter opens. As water reaches the outlet, pressure lifts the pop-up cap.
- Water discharges onto the lawn. The released water spreads across a suitable area where it can drain away without returning toward the house or creating another pooling problem.
- The cap closes. When the flow stops, the cap returns to its resting position.
The emitter does not need to be at the highest point of the yard. In a typical gravity-fed system, the outlet must be lower than the collection point, and the pipe must be laid out so water can reach it without getting trapped in low sections.
Main Components of a Pop-Up Drain System
A typical installation includes four main components.
- Water inlet or catch basin
The inlet receives runoff. A downspout adapter may be suitable for some systems, while a catch basin can collect water from a low area in the yard. The inlet should be selected according to the water source and the amount of debris likely to enter the system.
- Underground drainage pipe
The pipe carries water to the outlet. Solid drainage pipe is commonly used for conveying collected runoff, with pipe diameter and material selected according to the design and manufacturer requirements. Connections should be compatible and secured as required.
- Pop-up emitter
The emitter forms the final outlet. Its cap opens during discharge and closes when the flow stops. The cap should remain accessible and free of turf, soil and other material that could prevent movement.
- Discharge area
This is the location where water exits the system. It needs enough space and appropriate grading to handle the released runoff. Water should not flow back toward the foundation, collect against a building, erode a slope or create an unwanted problem on neighbouring property.
Pop-Up Drain Installation: Cross-Section and Key Details
A cross-section makes it easier to understand how the inlet, buried pipe and emitter work together.
Recommended image placement: Insert the pop-up emitter installation cross-section here, showing the downspout or catch basin, buried pipe, continuous downhill slope, ground level and emitter outlet.
Suggested image alt text: Cross-section of a lawn pop-up drain showing the inlet, sloped underground pipe and surface emitter discharging water away from a house foundation.
The most important installation details are the following.
1. Choose a Suitable Discharge Location
Identify a location where water can exit without returning toward the house or causing a new drainage problem. Consider the yard’s natural slope, nearby buildings, walkways, property boundaries and any drainage restrictions that apply locally.
A location that appears open during dry weather may become saturated during a storm. Consider where the water will travel after it leaves the emitter, not just where the cap will sit.
2. Check Elevation Before Digging
The emitter must be low enough relative to the collection point for the system to drain. A pipe that runs uphill toward the outlet, or contains a low section that traps water, can cause poor flow and recurring blockages.
Before excavating, plan the complete pipe route and check the available elevation difference. If the yard is flat, the intended outlet is too high or there is insufficient fall, a conventional gravity-fed pop-up system may not be practical without redesign.
3. Maintain a Continuous Pipe Slope
A consistent downward slope helps water move through the line and reduces the chance of standing water inside the pipe. Avoid unintended dips, reverse slopes and sections that settle after backfilling.
The required grade depends on the pipe diameter, system design and manufacturer’s instructions. Do not assume that one slope or trench depth is suitable for every property.
4. Install the Emitter at the Correct Height
The cap should sit at or slightly below the surrounding finished grade, following the emitter manufacturer’s directions. It should not be buried beneath soil, mulch or a thick layer of turf.
Keep the surrounding area clear enough for the cap to open and close. Also consider mower clearance so routine lawn care does not damage the emitter.
5. Test Before Backfilling
Before closing the trench, check the pipe connections and run water through the system. Confirm that water reaches the outlet, the cap opens and closes freely, and the discharge area carries water away without excessive pooling.
Testing before backfilling makes it easier to correct problems with the route, fittings or elevation.
Elevation and Discharge Distance: What Homeowners Should Know
Two factors determine whether a pop-up drain will perform well: the available elevation difference and the distance between the collection point and the outlet.
Why elevation matters
Gravity-fed drainage depends on the emitter being lower than the inlet and on the pipe maintaining a workable downward route. A long pipe run may be possible when the property has enough fall. A shorter run can still fail if the outlet is too high or the pipe contains a sag.
For example, if water enters a catch basin near the house and the planned outlet sits at a higher elevation, the system may not drain as intended. The solution may require a different outlet location, a redesigned pipe route or another drainage method.
How far should the emitter be from the house?
There is no universal distance that works for every property. The outlet should be far enough away that discharged water cannot readily flow back toward the foundation, but it must also be positioned where the water can disperse safely.
When planning the distance, consider:
- The natural slope between the house and the outlet.
- The soil’s ability to absorb water.
- The volume of runoff entering the system during heavy rain.
- The location of neighbouring properties, sidewalks, driveways and other structures.
- Local rules governing stormwater discharge.
A longer pipe does not automatically mean better drainage. If the pipe cannot maintain a suitable grade over that distance, a different layout may be necessary.
For related drainage options, Ware Landscaping’s downspout drainage solutions can provide useful context when deciding how to direct roof runoff.
Common Pop-Up Drain Problems: Clogs, Backups and Ice
A pop-up emitter has few moving parts, but the complete drainage system can still develop problems. The visible cap is often the easiest place to begin an inspection, although the cause may be farther upstream.
1. Leaves, Grass and Sediment Block the Emitter
Leaves, grass clippings, mulch and soil can accumulate around the cap or enter the drainage system through an inlet. Fine sediment may settle inside the pipe and gradually restrict the flow.
What to do: Remove visible debris from the cap and surrounding area. Inspect the upstream inlet and clear accessible debris. If water still backs up, the pipe may need flushing or a closer inspection.
2. The Cap Stays Open or Will Not Rise
A cap may stick because of dirt buildup, turf growing over the flange, a damaged hinge or a misaligned component. In other cases, the cap may be functioning correctly but there may not be enough water reaching it to lift it.
What to do: Clear debris, check for visible damage and test the system with a controlled flow of water. Replace damaged components if needed, following the manufacturer’s instructions.
3. Water Backs Up at the Downspout or Catch Basin
When water enters the system but cannot leave freely, it may spill out at the inlet or collect in the yard. Possible causes include a clogged pipe, crushed section, root intrusion, poor slope or a blocked outlet.
What to do: Check the emitter first, then inspect the accessible pipe and inlet. If cleaning the outlet does not restore flow, investigate the rest of the line rather than repeatedly cleaning the cap.
4. The Emitter or Pipe Freezes in Winter
In freezing weather, residual water can freeze around the outlet or inside a section of pipe. Ice may prevent the cap from opening or restrict the discharge path. A poorly sloped pipe or a sag that holds water can increase the risk.
What to do: Clear leaves and debris before winter, check that the system drains properly, and inspect for recurring standing water. Some emitter assemblies use a manufacturer-designed weep hole to help drain residual water. Do not drill holes or alter fittings unless the product instructions specifically allow it.
If the outlet is frozen, avoid forcing the cap open or using a flame to thaw it. If freezing occurs repeatedly, the pipe route, drainage slope and outlet assembly may need professional assessment.
5. Water Pools Around the Outlet
The emitter may open normally while water remains on the surface around it. This can happen when the soil is saturated, the outlet is in a low spot, the grade is too flat or the discharge volume exceeds the area’s ability to carry water away.
What to do: Observe where the water travels after it leaves the cap. Correcting the surrounding grade or selecting a more suitable discharge area may be necessary. If the yard remains saturated, the problem may require a broader drainage design rather than a replacement emitter.
Pop-Up Drain Diagnosis Checklist
Use this checklist when a pop-up drain appears to be failing. Start with the simple, visible checks before assuming the underground pipe needs replacement.
- The cap is clear: Remove leaves, grass, mulch and visible debris.
- The cap moves freely: Look for turf overgrowth, a damaged hinge or a misaligned cover.
- The inlet is clear: Check the downspout connection or catch basin for obstructions.
- Water reaches the outlet: Test with a controlled flow if conditions allow.
- The pipe drains properly: If water backs up despite a clear cap, check for blockages, crushing, root intrusion or poor slope.
- There are no obvious low sections: Look for signs of settling or recurring water retention along the route.
- The outlet is lower than the inlet: Confirm that the planned gravity-flow route has sufficient elevation difference.
- Water disperses safely: Check that discharged water does not flow toward the foundation or create a new pool.
- The system is not frozen: In cold conditions, look for visible ice and signs of water trapped near the outlet.
- The problem persists after cleaning: Arrange a more thorough inspection if the system still backs up or the yard remains waterlogged.
If the emitter opens but the yard remains wet, the issue may be the discharge area or the wider landscape grading. If the cap never opens and water backs up at the inlet, the pipe route, blockage or elevation may be the main concern.
Pop-Up Drains Compared With Other Drainage Systems
A pop-up emitter is one part of a drainage system, not a universal substitute for every other drainage method.
| System | Best suited for | Important consideration |
| Pop-up drain | Releasing collected runoff through a buried pipe | Needs a suitable outlet and workable elevation |
| French drain | Collecting subsurface water in persistently wet areas | Requires appropriate aggregate, pipe design and a planned outlet or discharge method |
| Catch basin | Collecting surface water from a low spot | Needs a clear inlet and an outlet route |
| Channel drain | Capturing surface runoff across paved areas | Requires correct placement and a suitable discharge connection |
| Regrading | Correcting surface flow and shallow pooling | May not solve groundwater or deep subsurface water problems |
Costs vary considerably by the size of the drainage area, excavation, pipe length, soil conditions, access and the need for additional components. It is better to compare systems based on the source of the water and the conditions on the property than to rely on generic installation-price ranges.
If your yard has several drainage issues, Ware Landscaping’s home drainage solutions has other approaches that may be relevant.
Environmental and Property Considerations
Redirecting water can protect one part of a property while creating a problem somewhere else if the discharge point is poorly chosen.
Before installing a pop-up drain:
- Direct water to a location where it can disperse without causing erosion.
- Avoid sending concentrated runoff onto neighbouring property or across pedestrian areas.
- Check local requirements before connecting to a public drainage system or discharging water near a street.
- Consider the effect of saturated soil and repeated runoff on nearby planting beds.
- Keep the discharge area clear enough for inspection and maintenance.
A pop-up drain manages where water exits the pipe. It does not remove pollutants automatically or guarantee that the discharged water will infiltrate into the soil.
Maintenance Tips for Long-Term Performance
A small amount of routine maintenance can help identify problems before they cause a larger backup.
Clean the emitter and inlet seasonally. Remove leaves, grass clippings, mulch and visible sediment, particularly after autumn leaf fall and heavy storms.
Test the system after significant rainfall. Check that the cap rises during discharge and returns to its resting position when the flow stops.
Inspect before freezing weather. Clear debris and investigate sections that retain water. Repeated winter freezing may indicate a problem with the pipe’s slope or drainage design.
Protect the cap during lawn care. Keep turf from growing over the flange, and take care when mowing or edging around the outlet.
Investigate recurring backups. If cleaning the cap does not restore flow, look for a blocked or damaged pipe, an inlet problem or an unsuitable elevation profile.
Check the discharge area. Look for erosion, standing water or signs that runoff is travelling back toward the house.
A Practical Example: Redirecting Downspout Runoff
Imagine a downspout releases roof water into a low area beside a home’s foundation. Each heavy storm leaves the lawn saturated, and water begins to collect near the house.
A pop-up drain may help if the runoff can be collected and carried through a properly sloped underground pipe to a lower discharge point.
The system would need a suitable inlet, a planned pipe route, adequate elevation difference and an outlet area that can handle the released water. After installation, testing would confirm whether the emitter opens and whether water disperses safely.
If the yard is flat, the soil is already saturated or the outlet would send water back toward the house, a pop-up emitter alone may not be enough. The drainage design may need to incorporate grading changes or another appropriate solution.
How Ware Landscaping Can Help
At Ware Landscaping, effective drainage begins with understanding where the water originates, how it moves across the property and where it can be discharged safely.
A pop-up emitter may be appropriate for some downspout and yard-drainage projects, but the right solution depends on the property’s elevation, soil, grading and runoff conditions.
A professional assessment can help determine whether the issue calls for a pop-up drain, a catch basin, a French drain, surface regrading or a combination of methods. The aim is to address the source of the problem rather than install a component that simply moves the water somewhere else.
Final Thoughts
A lawn pop-up drain can be a practical, discreet way to redirect collected runoff when the system is designed around the property’s elevation and drainage conditions. Its effectiveness depends on more than the emitter itself: the inlet must collect water properly, the pipe must maintain a workable downhill route, and the discharge area must carry water away safely.
When a system clogs, backs up or freezes, begin by checking the cap and inlet, then investigate the pipe, slope and outlet location if the problem persists. Recurring pooling around the emitter may point to a grading or soil issue rather than a faulty cap.
With careful planning, suitable installation and routine maintenance, a pop-up drain can be a useful part of a broader strategy to manage yard runoff and protect your landscape.