In the world of professional landscaping, we often see a recurring struggle: homeowners want a beautiful, “magazine-ready” yard, but they lack the time (or the water budget) to maintain a thirsty, high-maintenance lawn. At Ware Landscaping, we’ve seen one solution consistently rise to the top of the list for durability, aesthetics, and sustainability. Learning how to landscape with rock is a game-changer for any property owner.
Whether you call it rockscaping, xeriscaping, or stone-mulching, using inorganic materials like river rock, gravel, and boulders is a versatile approach. It works as well in the arid Southwest as it does in the humid Midwest or the snowy Northeast.
Why Rocks? Benefits and Realistic Expectations
Before you trade your lawnmower for a rake, it’s important to understand the pros and cons of shifting to a rock-based design.
The Benefits
- Unmatched Durability: Unlike wood mulch, which decomposes and needs to be replaced every 1–2 years, rocks last for decades. They don’t blow away in heavy wind and won’t wash out during typical rainstorms.
- Water Conservation: In states like California, Arizona, and Texas, water restrictions are a reality. Knowing how to landscape with rock allows you to create a “xeriscape” (water-wise) design that requires zero irrigation.
- Erosion Control: For sloped properties, rocks provide the weight and structure needed to hold soil in place, preventing the “washout” effect often seen with bare earth or light mulch.
- Fire Resistance: For homeowners in wildfire-prone regions, rocks create a vital “defensible space” around the home, as they are non-combustible.
The Realistic Expectations
Rocks are fantastic, but they aren’t “zero maintenance.” They can trap heat, which may stress delicate plants during record-breaking summers. They also collect organic debris (leaves, twigs) that must be blown or raked away to prevent weeds from seeding in the dust between the stones.
The Great Debate: Rock vs. Mulch
Homeowners often ask us: “Should I use rock or mulch?” When you are learning how to landscape with rock, the answer usually depends on your specific goals.
- Choose Mulch for traditional flower beds where you want to improve soil health. Mulch breaks down and adds nutrients back into the dirt, keeps roots cool, and retains moisture effectively.
- Choose Rock for paths, driveways, steep slopes, or areas where you want a permanent, clean look. Rocks are also superior for high-traffic areas where pets or kids might kick up lighter materials.
The Pro Strategy: At Ware Landscaping, we often recommend a hybrid approach. Use rocks for the structural parts of your yard (paths and borders) and organic mulch in the immediate vicinity of your nutrient-hungry perennials.
A Homeowner’s Guide to Materials (2025-2026 Trends)
When you head to your local supplier or big-box store like Home Depot, the options can be overwhelming. Here are the most popular choices for those figuring out how to landscape with rock.
1. River Rock
Smooth, rounded, and naturally colored in shades of gray, tan, and white.
- Best For: Dry creek beds, drainage areas, and borders.
- Cost (2025 Est.): $45–$130 per ton.
2. Pea Gravel
Small, pea-sized stones that are comfortable underfoot.
- Best For: Walkways, patio bases, and play areas.
- Cost (2025 Est.): $20–$55 per ton.
3. Decomposed Granite (DG)
A sandy, fine gravel that can be compacted into a hard surface.
- Best For: Natural-looking paths in dry climates.
- Cost (2025 Est.): $35–$65 per ton.
4. Lava Rock
Porous, lightweight, and typically red or black.
- Best For: Accents and desert-themed gardens.
- Cost (2025 Est.): $3–$8 per square foot.
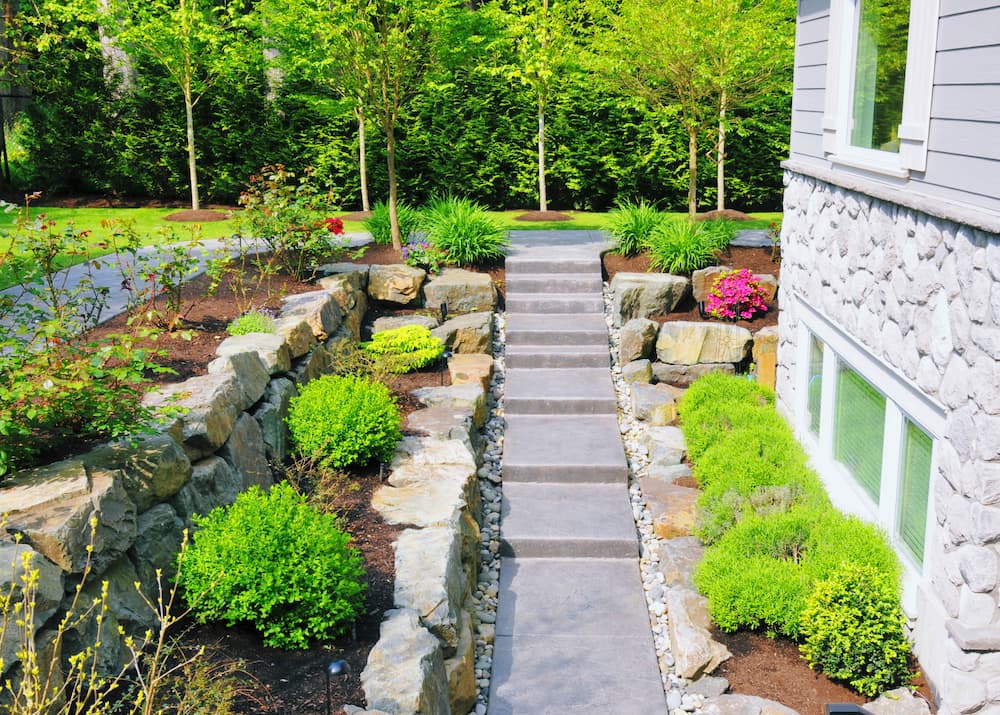
5. Boulders and Flagstone
Large, heavy focal points or flat pavers.
- Best For: Retaining walls, natural seating, and dramatic accents.
- Cost (2025 Est.): $150–$400 per boulder; flagstone ranges from $200–$600 per ton.
Step-by-Step: How to Landscape with Rock Like a Pro
Ready to tackle a rockscaping project this weekend? Here is how the pros do it.
Step 1: Planning and Measurement
Sketch your layout. Use a garden hose to “draw” the curves of your new rock bed. Calculate your square footage.
- The Math: Total Sq. Ft. x Depth (usually 3 inches or 0.25 ft) / 27 = Cubic Yards needed.
Step 2: Site Preparation
Remove all existing grass and weeds. You can use a sod cutter or a flat shovel. This is the most labor-intensive part of learning how to landscape with rock, but it’s critical for success.
Step 3: Grading for Drainage
Ensure the soil slopes away from your house foundation (a 2–5% slope is ideal). You don’t want your beautiful new rock bed to turn into a pond against your basement wall.
Step 4: Weed Barrier and Edging
Lay down heavy-duty, UV-resistant landscape fabric. Overlap the edges by at least 6 inches. Install your edging metal, plastic, or stone to keep the rocks contained.
Step 5: Spreading the Rock
Dump the rocks in small piles across the area and use a heavy-duty rake to spread them evenly. Aim for a depth of 2–4 inches for full coverage.
Step 6: The Finishing Touch
Rinse the rocks with a garden hose to wash away the quarry dust. This will instantly make the colors “pop” and show you exactly how to landscape with rock effectively for visual impact.
Estimated Costs (2026 Projections)
Planning your budget? Here is what to expect for a standard 500 sq. ft. project:
- DIY Approach: $1,000–$3,500 (includes rocks, fabric, edging, and tool rentals).
- Professional Installation: $4,500–$8,500+ (includes grading, professional design, high-quality materials, and labor).
When to Call Ware Landscaping
While a small gravel path is a great DIY project, large-scale rockscaping involves heavy lifting and precision grading. If you are looking at installing retaining walls, multi-ton boulders, or complex drainage systems, it’s safer (and often more cost-effective) to hire the experts.
At Ware Landscaping, we have the equipment and the eye for design to show you how to landscape with rock in a way that increases your home’s value.
Ready to start your rockscaping journey? Contact us today for a professional consultation.