Permeable pavers are more than just a beautiful way to upgrade your outdoor space. They’re an eco-friendly, water-smart solution to managing stormwater runoff, reducing erosion, and improving groundwater recharge. Whether you’re paving a driveway, patio, walkway, or parking space, knowing how to install permeable pavers properly is crucial for long-term durability and performance.
This guide takes you through everything you need to know from initial planning to final inspection. Whether you’re a DIY enthusiast tackling a weekend patio project or a professional landscaper handling a large-scale driveway installation, this resource has you covered.
What Are Permeable Pavers?
Permeable pavers are designed to allow water to pass through them into the ground below. Unlike traditional paving methods that create runoff and strain drainage systems, these pavers help filter water back into the soil.
Permeable Pavers. Source: Globmac
They are typically made of concrete, stone, brick, or plastic grid systems and are especially useful in urban areas prone to flooding or with strict stormwater regulations.
Benefits of Permeable Pavers
- Reduce stormwater runoff
- Filter out pollutants before water enters the groundwater
- Mitigate erosion and pooling
- Help prevent heat island effects in urban environments
- Require less stormwater infrastructure
Step-by-Step Installation Guide for Permeable Pavers
1. Design and Planning
Start with a clear plan. Measure the area and sketch your layout. Decide on the load-bearing requirements: a driveway will need a deeper base than a walkway.
Tips:
- Use graph paper to scale your plan.
- Plan a slope of 1-2% to ensure proper water flow.
- Check local building codes or HOA rules. Some regions require permits for permeable paving.
- Consider aesthetics: will you use square blocks, interlocking designs, or plastic grids?
2. Site Preparation
Excavate the area to a depth of 8 to 20 inches, depending on use and soil type.
- Remove existing sod, grass, or concrete.
- Excavate at least 15 inches for driveways, 8-12 inches for walkways and patios.
Tools Needed: Excavator or shovel, wheelbarrow, stakes and string, level.
3. Install Geotextile Fabric
Place geotextile fabric at the bottom of the excavation. This helps separate the soil from the gravel and prevents silt from clogging the drainage layer.
Note: This step is optional in very stable soil conditions, but recommended for longevity.
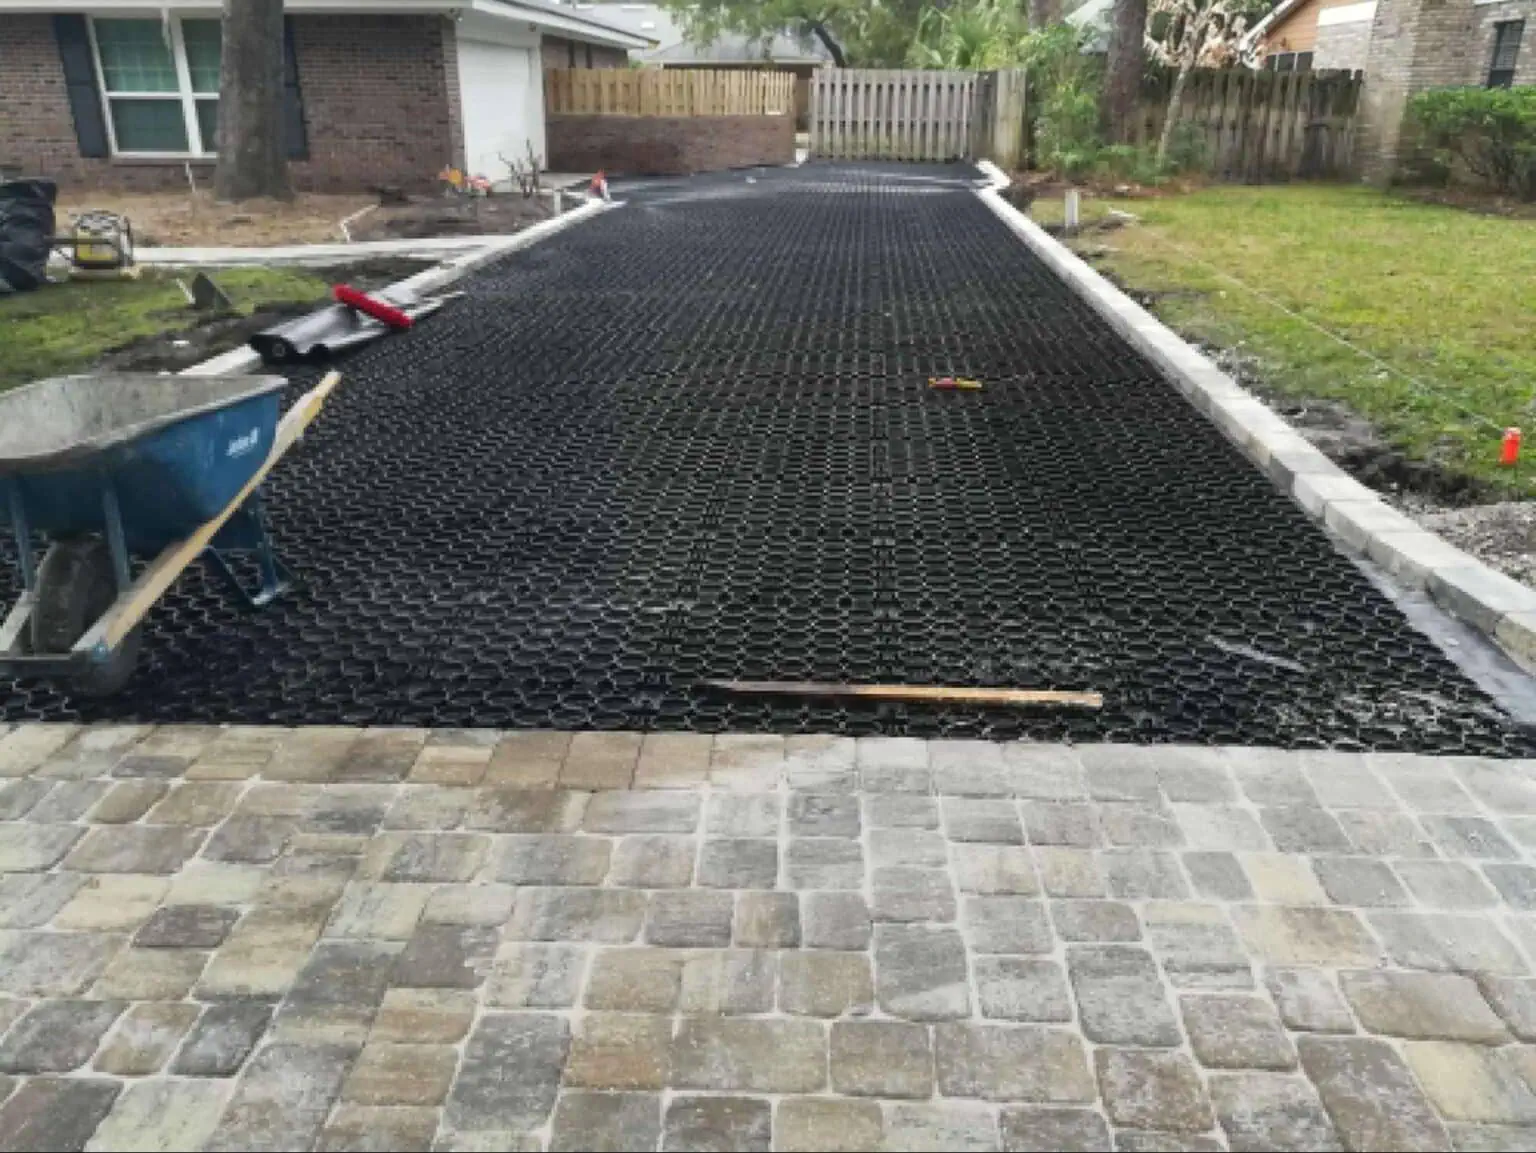
4. Build the Base Layer
This is the heart of the drainage system. Use crushed stone or clean gravel (no fines).
- Add a 4-6 inch layer of coarse gravel (1-2 inch stone), compact thoroughly.
- Add another 4-inch layer of medium gravel (1/4 to 1.5 inch), and compact again.
Tools: Plate compactor, rake, screed board.

5. Edge Restraints
Edge restraints hold the pavers in place and prevent spreading.
- Use metal, plastic, or concrete edging.
- Anchor firmly into the ground using spikes or stakes.
6. Bedding Layer
Add a 1-inch layer of fine gravel (e.g., #8 stone) or coarse sand to act as a bedding layer.
- Level with a screed board to ensure even paver placement.
7. Lay the Pavers
Start laying the pavers from one corner and work your way across.
- Ensure pavers are tight but not jammed together.
- Check the level frequently.
- Cut edge pavers as needed using a diamond blade saw or splitter.
8. Fill the Joints
Use small, clean gravel or polymeric sand to fill the gaps between the pavers.
- Sweep diagonally with a broom to ensure full joint fill.
- This helps lock pavers in place and allows water to drain.
9. Compact the Surface
Run the plate compactor across the surface to settle pavers and joint material.
- Reapply joint fill if necessary and compact again.
- Clean off excess materials.
10. Final Inspection
Check slope, stability, and water flow.
- Water test the area to ensure proper drainage.
- Refill joints and correct uneven spots.
Tools & Materials Checklist
| Category | Items |
| Pavers | Concrete, brick, stone, or plastic grid pavers |
| Aggregates | Coarse, medium, and fine gravel |
| Fabric | Geotextile fabric |
| Edge Restraints | Plastic, metal, or concrete |
| Tools | Shovel, rake, mallet, compactor, screed board, saw |
Common Mistakes to Avoid
- Skipping compaction: leads to uneven settling.
- Using non-permeable joint material: defeats the drainage purpose.
- Poor slope planning: causes water pooling.
- No edge restraints: leads to shifting and instability.
Maintenance Tips
- Sweep regularly to keep joints clear.
- Replenish joint material as needed.
- Inspect annually for shifting or water pooling.
- Avoid chemical weed killers, which may clog joints.
When to Hire a Professional
Environmental Impact and Regulations
Permeable paving helps reduce the need for storm sewers and retention ponds. Many municipalities offer credits or incentives for using permeable systems.
- For example, Seattle Public Utilities outlines incentives for green infrastructure.
- TrueGrid Paver discusses eco-friendly and storm-resilient design benefits.
- Eagle Pavers offers in-depth technical guidance for professionals.
Final Thoughts
Installing permeable pavers isn’t just a smart landscaping choice, it’s a long-term investment in sustainability, water management, and curb appeal. With careful planning and the right materials, you can transform your outdoor space into something both functional and environmentally responsible.
Whether you choose to DIY a patio or bring in pros for a driveway overhaul, permeable pavers are a smart and rewarding choice for modern landscaping.