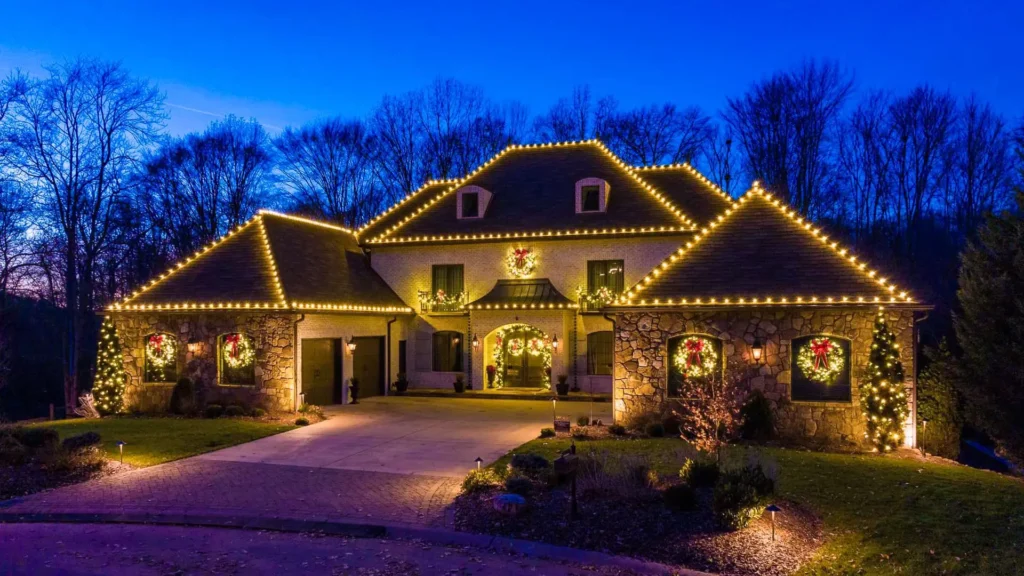
Transforming your residence into a festive scene starts with knowing how to successfully install Christmas lights on a house. Achieving a safe, durable, and visually appealing display requires a professional, methodical approach—from meticulous planning and equipment inspection to strict adherence to safety standards.
This comprehensive guide leverages expert best practices to show you how to install Christmas lights on a house that will shine brightly and safely throughout the holiday season, ensuring compliance with US electrical and safety regulations.
1. Preparation is Paramount: Measure, Plan, and Prioritize Safety
Before you touch a single light strand, thorough preparation is essential to avoid common pitfalls like insufficient lights or electrical overloads. This planning phase minimizes risk and ensures efficiency.
Key Planning Steps:
- Measure Everything: Use a measuring tape or string to calculate the exact linear footage of every area you plan to illuminate: rooflines, gutters, window frames, railings, and columns. Precision is critical for buying the correct quantity of lights and extension cords.
- Diagram Your Layout: Sketch out your design on a photo of your home, highlighting features like peaks or eaves. This visualization helps you map out your power access points, allowing you to evenly distribute the electrical load across different circuits.
- Calculate Light Density: For a lush, professional-grade look, space bulbs approximately every 6-12 inches. A simple calculation helps estimate strand needs. Purchase 10-15% extra material for slack, connections, and replacement needs.
- Choose UL-Listed LED Lights: When you install Christmas lights on a house, prioritize UL-listed or ETL-certified LED varieties. They are energy-efficient (up to 75% less energy used), run significantly cooler (minimizing fire risk), and are designed for durability in outdoor conditions.
2. Electrical and Physical Safety: The Non-Negotiable Rules
Working with electricity and ladders outdoors means safety must be the top priority. Strict adherence to these protocols prevents accidents, which frequently include falls and electrical hazards.
| Safety Precaution | Why It’s Essential (Especially in the US) |
| Use GFCI Protection | MANDATORY. Always plug into GFCI-protected outlets or use weather-resistant GFCI ground stakes. A Ground Fault Circuit Interrupter instantly cuts power if a short occurs due to wet conditions (rain, snow, or ice), protecting against electrical shock and fire. |
| Inspect All Equipment | Before every season, thoroughly inspect all light strings, extension cords, and timers for frayed wires, cracked insulation, damaged sockets, or bare spots. Discard or repair damaged components immediately. |
| UL Listing is Key | Ensure lights and cords are specifically UL-listed for outdoor use. This certification guarantees the product meets rigorous US safety standards (like UL 588) for resisting moisture and extreme temperatures. |
| Avoid Overloading Circuits | Never daisy-chain more strands than recommended by the manufacturer. Calculate your display’s total wattage and compare it to the amperage limits of your circuits (typically 15-20 amps). Split the display across multiple circuits to prevent overheating. |
| Ladder Safety Protocol | Always work with a spotter. Use a sturdy ladder rated for your weight and place it on level, stable ground. Never overreach; climb down and move the ladder to the next position. Avoid working in rain, high winds, or icy conditions. |
3. Gathering the Proper Tools for Damage-Free Installation
A professional installation is damage-free. Avoid using staples, nails, or tacks at all costs. These puncture wires, creating electrical hazards, and damage your roofing, trim, or siding, which can lead to leaks or costly repairs.
Essential Tools and Materials Checklist:
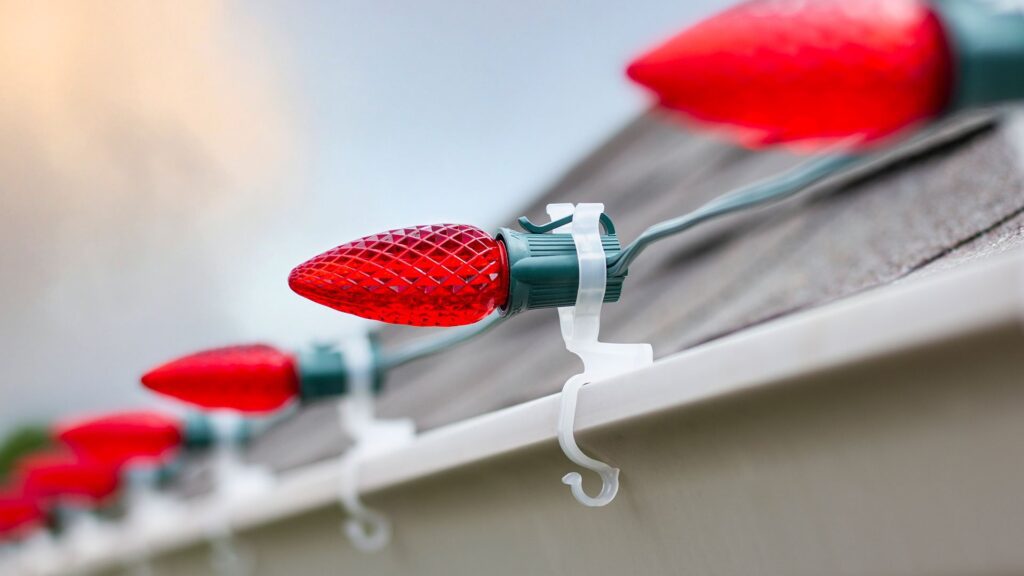
- Outdoor-Rated LED Lights (String, C7/C9, or icicle styles).
- Weather-Resistant Extension Cords (clearly labeled for outdoor use).
- GFCI Power Stakes or outdoor timers.
- Universal Clips or Vinyl Hooks (best options for gutters and shingles as they require no puncturing).
- Zip ties and Electrical Tape (for securing wires and sealing connections).
- A Sturdy Ladder and a Spotter/Partner.
- Optional: Hot Glue Gun (for temporary, removable adhesion of clips to surfaces like brick or stone—apply the glue to the clip base, not directly to the wire).
4. Step-by-Step Guide to Installing Christmas Lights on a House
Follow this methodical process, ensuring you work efficiently and safely in daylight hours.
- Test and Inspect Lights: On the ground, untangle strands, plug them in, and check for functionality. Replace faulty bulbs and fuses, and discard any set with exposed or frayed wiring.
- Install Fasteners First: Begin at the top and work downward. Attach clips every 6-12 inches along rooflines, gutters, or siding. Use hammer-free options to prevent damage to shingles and trim.
- Hang the Lights Securely: Carry one strand at a time up the ladder. Clip the lights into the pre-installed fasteners, starting from the power source end. For railings and columns, wrap the lights and secure them with zip ties for wind resistance and a tidy appearance.
- Manage Power Connections: Place your GFCI power stakes in a discreet, accessible location protected from direct water pooling. Route all extension cords safely along walls, trim, or edges, ensuring they are nowhere near foot traffic or areas where snow melts. Use weatherproof covers or electrical tape to seal outdoor connections.
- Finalize and Automate: Install your timers or smart plugs to automate the display, typically turning on at dusk and off late at night to conserve energy. Take a final walk-through to ensure all clips are tight, no cords are dangling, and the light display is even.
5. Maintenance and Post-Holiday Storage
Your job isn’t done after the initial setup. Periodically check the display throughout the season, especially after heavy weather, for dislodged lights or exposed wiring.
When the holidays conclude, proper takedown is crucial for light longevity. Unplug everything, gently remove the lights and clips, and carefully coil each strand individually around a reel or piece of cardboard. Label the strands by location (e.g., “Front Eave,” “Left Porch”) before storing them in sealed, dry bins. This organized approach ensures your ability to easily install Christmas lights on a house next year.
Need Help Making Your Property Shine Year-Round?
While homeowners can successfully install Christmas lights on a house, maintaining a professional-grade landscape requires specialized expertise. Whether you need thorough seasonal cleanups, reliable snow removal for your commercial property, or are planning a beautiful hardscape project like a new walkway or patio, Ware Landscaping is your trusted partner for property maintenance and improvement.